In this section, you’ll utilize visual aids to help guide you to make the right call on any hand you may receive at a blackjack table. This chapter will expand on the information laid out in the blackjack basic strategy guide using aids that provide clarity on the best move for any situation. Using colour-coded charts and tables for all deck varieties, the information will help you expand your game expertise. The two formats used are the group of playing rules in a black-and-white table, and a summary of various strategies presented in a colour-coded matrix-style blackjack chart.
In this article, we're going to discuss:
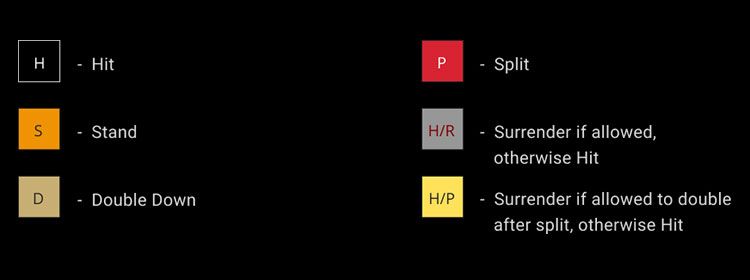
This section includes four strategy tables and also four instances of a blackjack chart. These are for use for a single deck blackjack strategy and multi-decks too, but naturally there are different charts according to the deck size in play. Before you examine the charts, it is important that you understand the abbreviations used within the blackjack chart and tables. Below are listed all the ones that will appear in this section. It is not essential that you remember all of them listed below, but with time they should become more familiar, and you will not need to look them up.
A typical table will differentiate between soft and hard hands, and pairs. Where relevant, footnotes are included for additional clarity.
|
|
These charts will help you build on the knowledge you acquired in the previous chapters. With practice and repeated use, you will become more accustomed to any blackjack basic strategy chart and get a feel of how a greater number of hands should be played.
A blackjack professional will know most, if not all of the charts off by heart, but you must not worry about such a task right now. Simply ensure that you understand the format and layout of the charts and tables, and the information contained within.
In the next two sections, you will see the charts and tables that provide optimal plays for all possible hands. The guide will explain how the charts and tables work, and how to use them. We will list hand examples to demonstrate blackjack basic strategy chart use, and in the final section offer some useful tips to get even more use out of the visual aids.
By the end of this chapter you should be well-placed to further bolster your knowledge by exploring blackjack odds, side bets, and more.
USING BLACKJACK CHARTS
-KAw7jzRIFk.jpg)
-ZinNzEf2l9.jpg)
Before diving into the tables and charts, it’s important to understand a few basic rules pertaining to how a blackjack basic strategy chart works and how you can get the most out of one. For each set of rules presented to you, the strategy information will be presented to you in two different ways. First, you will see a black-and-white table, and second, a colour-coded chart. They will be referred to as “table” and “chart” in this section so you are fully aware which information is being referenced.
Please be aware that the basic strategy charts list a player’s two-card value and also a possible multi-card value as a consequence of hitting a different hand previously obtained on one or more occasions. Or to put it another way, play your multi-card hand as if it were an original two-hand total.
- As an example, should a player be dealt a 7-5 hand against a dealer’s 3 upcard in what is a six-deck game with soft 17 and DAS, the blackjack table charts will instruct you to hit. Say you then draw a 3, to give you a total of 15, against the dealer’s 3, the strategy for 15 v 3 states you should stand. And thus this is what you should do.
- With soft hands, doubling down with 3 or more cards is not an option, a total that would have resulted in a double down if it were reached with just two cards, must now revert to a hit or stand decision. Let’s use another example to explain this further. Let’s imagine a player being dealt an A-3, and the dealer’s upcard is a 4. As per the chart’s advice, the player hits and is dealt a 4. The hand is now A-4-3, or effectively A-7. If the player had been dealt A-7 originally, doubling down would be the optimal move. But with three cards, this is not an option, so the optimal move is to stand.
- Another example shows the strategy when the house does not permit resplits, or if they do the player has split up to a maximum of four hands. With a multi-deck pack, a player is dealt a pair of 6s, and the dealer a single 6 as their upcard. The player splits the cards, and receives another 6. As resplits are not permitted, this hand must be played as a hand totalling 12. The charts will suggest standing against a dealer 6 in this situation. If resplits were allowed, as unlikely as it may be, it would be possible for the player to keep being dealt a 6 and splitting further hands.
- A final point to note is that the basic strategy charts and tables operate using hand totals, rather than by assessing the individual card total. So a chart may suggest hitting on a hard 15 against a dealer’s 10, whatever the composition of the 15 is. Later chapters will delve into assessing individual cards within totals.
The presentation of the tables and basic strategy charts may differ, but they contain identical information. The difference is merely visual, as some players respond better to a matrix chart with colour-coding, compared to a plain table. Use whatever suits you best even when playing in a live casino.
The composition of the tables are consistent. The dealer’s upcard is displayed along the top of the chart. The hand of the player can be located in the first column, and will be grouped in order of hard, soft and paired hands. To show this in action, let’s consider some further examples.
|
|
As long as you know the blackjack basics, the charts should allow you to access the optimal play within seconds, and you’ll soon become comfortable using them to further your blackjack journey.
BLACKJACK CHARTS TIPS
In summary, let’s look at some tips on how to make the most of blackjack table charts, using the information laid out in this chapter. Once you are comfortable with using the visual aids, you are in a great position to compliment your knowledge further in subsequent sections.
1. Using the blackjack table charts provided, you should be in a position to know what call to make for any hand under any variation of house rules. Just ensure that when you play on a table, you know the full rules in place.
2. For every table, there is a chart with identical information. Both options are offered as some prefer a table, whilst some find a colour-coded chart easier to interpret.
3. This is because the best basic strategy as outlined in the guide is rule dependent. There will be variations on the optimal call depending on whether the table is H17 or S17, or whether it is DAS or NDAS.
4. By knowing your strategy and utilizing the blackjack table charts, you can reduce the house edge significantly. The lowest edge you can attain is by playing a H17 with a single-deck and the ability to split Aces, or just a H17 game.
5. Ideally you want to play in a game where the house edge has been reduced to 0.5% or under.
6. Four-deck games are rare, so if you want to be familiar with as many of the charts as possible, and start with those that deal with single and double decks.